Showing posts with label sweet. Show all posts

Thursday, June 27, 2013

Vanilla Berry Frozen Yogurt Pops

Summertime. Otherwise known on our back deck as popsicle season. Icy treats go fast around here - like multiple times a day fast. I can't really blame the little blue-tongued bandits. Popsicles are awesome. They're nice to look at, fun to eat, sweet, cold, refreshing, satisfying, and thirst-quenching all in one cute little party of a package. The red, white, and blue ones scream 4th of July.

Of course the astronomical sugar content and food dyes in most grocery store brands leave something to be desired, but who needs them anyway? Assuming you have a freezer in the vicinity, homemade popsicles are just about the easiest thing in the world to make with kids. 
Fruit juices and purees, frozen bananas, lemonade, coconut milk and yogurt, preferably chunked up with plenty of fresh fruit, all make for amazing popsicles with less than half the parental guilt (as evidenced by my own personal and totally unscientific study) of grocery store brands. So go ahead. Embrace the stick this summer. Bonus points if you serve these red, white, and bluish frozen yogurt pops for the 4th of July.
We opted to use Stoneyfield Organic Greek Fat Free Yogurt but low fat or full fat plain Greek yogurt would work well too.
Despite what my little ham of a son would lead you to believe, Stoneyfield did not sponsor this post. I paid for my own yogurt fair and square, though I do admit to using a coupon to cover part of the cost of the Wholesome Sweeteners Organic Blue Agave we're going to talk about in a minute.
I like to use agave here rather than honey because of its thinner, runnier consistency. The agave swirls into the yogurt effortlessly for uniform sweetness throughout the pops. We used Wholesome Sweeteners Organic Blue Agave and pure vanilla extract since that's what I had on hand. If you are so inclined you could save yourself a step, skip the vanilla and use Wholesome Sweeteners Organic Vanilla Blue Agave Syrup instead of plain.
Vanilla Berry Frozen Yogurt Pops

16 ounces plain Greek yogurt
4-6 tbsp Wholesome Sweeteners Organic Blue Agave
2 tsp real vanilla extract
1&1/2 cups raspberries and/or blackberries, fresh or frozen

In a small bowl, stir together the yogurt and 2-3 tbsp of the agave, depending on how sweet you like your pops. At this point the yogurt should taste slightly sweeter than you want it. The flavor will mellow once it's frozen. Set aside.

In a separate bowl, mash the berries with a fork. Stop when you still have some chunks of whole berry and plenty of bright, colorful juice. Stir in the remaining 2-3 tbsp agave.

In popsicle molds (or paper cups if you don't have popsicle molds) layer the yogurt and berry mixtures, starting and ending with yogurt. Use a chopstick or anything with a slim, long handle to gently swirl the yogurt and berries together in the mold. Insert the sticks and freeze for at least 4 hours and up to several days.

To release the pops from the mold, run them under cool to lukewarm water for about 30 seconds and gently wiggle out of the mold.

Makes 5 large pops.

Happy 4th!

Thursday, June 20, 2013

Avocado Chocolate Mousse Mini Pies

Say what? Chocolate avocado mousse?

In case you just missed the pinched up face and lolling tongue, Looly detests avocado. But like many red-blooded seven-year-olds, she adores chocolate, which is precisely why Bean, Roo, and I couldn't resist playing a trick on her.

For months (years?) I've seen recipes for vegan chocolate mousse made with an avocado base floating around...so long that I honesty can't remember where I saw it first. Food 52 has a version. I've watched Giada De Laurentiis whip up a batch on an episode of Giada at Home. There's another version here. And here. And here.

Suffice it to say the idea of using creamy avocado as a base for chocolate dessert is decidedly not my own. The evil plot to dupe my own offspring into eating her most despised food, however, is all mine.

Bean and Roo are avocado fiends and any mousse without eggs is bound to be a friend of ours, so it was about time to give this thing a go. We got to work while Looly was busy making dream catchers and rag dolls at art camp. Everything was going along just fine until my avocados started disappearing.  
I think we can safely say who's to blame, but luckily there's nothing like a bowl of melted chocolate to distract a couple of avocado bandits.


Chocolate Avocado Mousse Mini Pies
inspired by Food 52, vegan bakers, Giada De Laurentiis, and the Internet in general


2 ripe Haas avocados
8 ounces semisweet chocolate chips
1/2 cup coconut milk (Use the thick part that gathers toward the top of the can. Leave behind the liquid)
1 tsp real vanilla extract
3-4 tbsp agave syrup (or less)
pinch of salt
8 mini pie crusts of your choice. We went with store bought graham cracker, but chocolate cookie crust or traditional homemade pie crust would be lovely too!
1/4 cup flaked coconut

Combine the chocolate chips and thick coconut milk in a microwave-safe bowl. Heat in 25 second intervals, stirring in between, until the chocolate is melted. Stir well and let cool slightly.

Place the avocados, vanilla, agave, and salt in a food processor and puree until smooth. Poor in the chocolate-coconut milk mixture and pulse until everything is well-incorporated, smooth, creamy, and delicious.

Put the mousse in a piping bag (or zip top plastic bag with a corner cut off) and pipe into the pie shells. Chill until the mousse is firm, about 2 hours.
Garnish the chilled pies with flaked coconut and fresh raspberries. The decision whether or not to disclose the full ingredient list is yours to make. As for us, we waited until those first few bites were thoroughly savored then...
Guess what, Looly?! Avocado surprise! 

Lucky for me that kid's a pretty good sport. She even went on to finish the mousse and declared that she actually likes avocado sometimes. When it's in other stuff. Like chocolate.

In the words of Bean, "Yeah, Looly. So does everybody".

Saturday, June 15, 2013

Fruit Salad with Vanilla-Lime Dressing

School's out, summer is in full swing and the KC kitchen staff is more eager than ever to get to work.
I, on the other hand, am readjusting to the amped up summer house volume and the sheer exhaustion of fielding ceaseless requests to paint, set up the sprinkler, help practice piano, go to the park, walk to the library, recall the Spanish word for prairie (pradera, by the way), host a spelling bee, make popsicles, make worksheets, make popcorn, make playdough, put on a puppet show, demonstrate a proper cartwheel, and the dreaded...can we plug in the glue gun?

With the day spiraling into hot glue territory, it's time to act. Fast. So what's quick, simple, can be made from stuff you already have sitting on your kitchen counter and irresistibly enticing to a swarm of sunscreen-slathered, half-dressed ragamuffins armed with a glue gun?

Fruit freaking salad, baby.
Fruit Salad with Vanilla-Lime Dressing
inspired by The Pioneer Woman

For the dressing

1 cup granulated sugar
2 limes, zest and juice
1 cup water
1 & 1/2 tsp good vanilla extract (or the caviar of one fresh vanilla bean)

For the salad

1/2 medium peeled, pineapple, cored and chopped into chunks
1/2 small cantaloupe, rind removed, seeded and chopped into chunks
1 pint strawberries, hulled and sliced
2 cups grapes, halved
1/2 pint blueberries
1/2 pint raspberries
1 handful fresh mint leaves

To make the dressing, combine the sugar, lime zest, juice, water and vanilla in a small saucepan. Bring it to a boil, stirring until all of the sugar is dissolved. Reduce heat and simmer 10-15 minutes until it starts to thicken. Remove from heat and let cool.
You'll be relieved to know that preparing a fruit salad requires no advanced training. Wash, peel, core, and slice fruit as necessary and put it all in a bowl. Use whatever fruit you have. Enlist your glue gun-wielding kitchen staff and go to it.
Pour the cooled dressing over the top of the fruit and toss everything together gently. Or if your staff has a case of the pickies, leave the dressing on the side and use it as a dip instead. Garnish the whole beautiful mess with mint leaves.
Don't forget to destroy the glue gun while their slurping the last of the juice from their bowls.

Tuesday, May 28, 2013

Panna Cotta with Strawberry-Rhubarb Sauce

The little KC kids are obsessed with jello. Like a lot of kids, the infatuation has more to do with the slip and jiggle than any particular flavor profile. I mean, when you assert preference by color, how important, really, is taste? I'm going with not very.

Given the penchant for wiggle, I thought panna cotta might be right up their alley, especially topped with a glossy bright strawberry-rhubarb sauce. And bonus, real vanilla and fresh strawberries taste so much better than red.

Disclaimer time. The original recipe calls for creme fraiche, which while picking up rhubarb and buttermilk at Whole Foods, I could have sworn was happily residing in my fridge just waiting to be called into action. Alas, when I got home, that very creme fraiche mysteriously had morphed into mascarpone! I hate when that happens. Fortunately there's almost always some Greek yogurt hanging around our house, which valiantly stood in for the mysterious traitor.
Buttermilk-Yogurt Panna Cotta with Strawberry-Rhubarb Sauce
adapted from Bon Appetit 

For the Panna Cotta

1 & 1/4 tsp unflavored powdered gelatin
1 & 1/4 cups heavy cream
1/3 cup granulated sugar
1/4 tsp kosher salt
1 vanilla bean, halved lengthwise
1 & 1/4 cups buttermilk
1 & 1/4 cups full-fat plain Greek yogurt

For the Sauce

1 & 1/2 cups (about 10 ounces) strawberries, hulled
1/4 cup granulated sugar
2 cups rhubarb, (about 8 ounces) sliced 1/4-inch thick
1/2 tsp unflavored powdered gelatin

For the Panna Cotta, pour 1/4 cup of cold water into a little bowl and sprinkle the gelatin over the top. Let is sit for about 10 minutes until the gelatin swells and softens.
In a medium saucepan, combine the cream, sugar, and salt. Scrape the gooey seeds from the vanilla bean into the liquid, then toss in the pod too.
Bring the mixture to a simmer then add the softened gelatin mixture. Stir to dissolve all the gelatin, then remove the pan from heat and let it cool. Once cool, remove the vanilla bean pod. Whisk in the buttermilk and yogurt. Pour the mixture into small ramekins or dessert glasses. Chill in the refrigerator until firm, at least 2 hours.
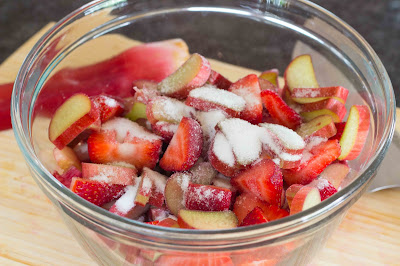
For the sauce, combine the strawberries, rhubarb, and sugar in a medium heat-proof bowl. Toss everything together so the sugar coats the fruit.
Cover the bowl tightly with plastic wrap, folding and pressing the wrap so it extends just along the top edge of the bowl. If it helps, you can wrap a large rubber band around the rim of the bowl to hold the plastic wrap in place.
Set the bowl over a pot of simmering water, careful not to let the plastic wrap touch the pot. Heat the berry-rhubarb mixture without stirring for about 45 minutes, until the rhubarb looks pale and the fruit is soft.
Use a fine sieve to strain the fruit mixture, reserving the liquid only. Don't press and push on the fruit to get more juice out or your sauce won't be nearly as lovely. Get what you can, then add water to make 1 cup total.

In a separate small bowl, sprinkle the gelatin over 2 tablespoons cold water. Let it stand for 10 minutes.

While the gelatin is softening, bring the strawberry-rhubarb liquid to a boil in a small saucepan for about 3 minutes, stirring every now and then to prevent burning. Add the softened gelatin mixture and stir well to dissolve any stubborn gelatin granules. Remove from heat and let stand until completely cool.

Top the cold, set panna cotta with the cooled sauce and chill until the sauce is thickened, at least 2 hours.

Sunday, May 5, 2013

Grampy's Magic Bars

Recognize these guys?
They were a welcome and familiar site on my grandmother's kitchen table back in the early 80's. Magic Bars. Could there be a more enticing treat for a gaggle of sweets-loving granddaughters? I think not. Grammyarta, as she was known, tended to agree.

Last week my dad, known as Grampy by many these days, celebrated his 76th birthday. Sadly, hundreds of miles away, we didn't get to spend the day with him, but we did whip him up a batch of Magic Bars. Happy birthday, Dad!
That's a good-looking 76, don't you think?!
Of course, the Magic Bars of yore were topped with chopped walnuts and sometimes, if we were really lucky, pecans. These days we avoid tree nuts here at Casa Kid Cultivation but guess what we don't avoid?

Pretzels. And pepitas. The two work together to deliver all the crunchy, salty, meaty flavor of nuts...without the nuts! So gather the troops and let the kids take the lead. This is the ultimate easy-peasy kid-friendly, grampy-approved recipe.
Grampy's Magic Bars
adapted from Eagle Brand

1/2 cup butter, melted
1 & 1/2 cups graham cracker crumbs
14 ounces sweetened condensed milk
2 cups chocolate chips
1 & 1/3 cups flaked coconut
1/2 cup chopped pretzels
1/2 cup pepitas

Preheat the oven to 350 degrees. Grease or spray a 9"x13" pan with cooking spray.

Put your graham crackers (I used about 7 ounces, or 1/2 a regular-sized 14.4 ounce box) in a large zip-top bag and let the kids bang the heck out of it with a rolling pin or baseball bat until you have crumbs.
Once you have crumbs, pour the melted butter directly into the zip-top bag, reseal, and mash the butter around into the crumbs until it's all combined.
Press the butter-crumb mixture into the bottom of the prepared pan. Here's a trick. If you're careful, you can dump the crumbs into the pan, turn the plastic bag inside out and, placing your hand into what used to be the outside, use the messy, buttery inside of the bag to press down the crumbs like so. 
There. I just saved you a hand washing. You're welcome.
Pour the sweetened condensed milk in an even layer over the graham crackers.
Scatter the chocolate chips over the milk.
Add the pretzels and pepitas...
Then the coconut. Did I mention this is the perfect kid-driven recipe?
Pop them in the oven for 22-25 minutes until lightly browned. 
 Let them cool then cut into bars. Send them to your dad or grampy for his birthday.
 But make sure you save a few for yourselves.