Showing posts with label appetizer. Show all posts

Monday, June 24, 2013

Beet Hummus

They're baaaaaaack.

Beets. Pretty little suckers, I'll give you that. But it's their deep dirt earthy flavor I'm still struggling with. Still that doesn't keep them out of our CSA box every week.

Last summer we made them into beet chips with a side of curried yogurt dip and they were good. Really, addictively, shockingly good and I have to admit, I kind of loved them. So maybe, perhaps I don't hate beets as much as I think I do. In an effort to push my own culinary boundaries as much as I push the KC kids' and in penance for the cruel avocado trick I played on Looly last week: Beet hummus.
At least it's purple. That's something. Now, the original recipe did not call for garbanzo beans but I felt I had to include them both to warrant the "hummus" title as well as to convince myself that there was plenty of stuff in there that I like. I know. I can be very grown-up sometimes.
Once the beets are cooked, this hummus comes together so fast. I literally threw it together in the 5 minutes it took the kiddos to rescue their bikes and sidewalk chalk from the backyard before a thunderstorm was scheduled to roll through. By the first rumble, we were crunching naan chips with this lovely bowl of vibrant purple dip.
And guess what? It was good. Seriously good. The beets add a faint sweetness to the garlicky, lemony, creamy hummus with absolutely no dirt flavor to speak of. The cumin and tahini give the whole medley a satisfying warm nuttiness making it the perfect compliment for crisp mild vegetables or salty chips. And the color, well, you cannot beat that color. So, beets, perhaps there's something between us after all.

Beet Hummus
adapted from Simply Recipes

1/2 pound beets
1 cup canned garbanzo beans, rinsed and drained
2 tbsp tahini
zest and juice of 2 lemons
1 clove garlic
1 tbsp ground cumin
1/4 tsp kosher salt
1/4 tsp black pepper

Cut the greens off the beets and reserve them for another recipe or discard. Scrub the beets in cold water. Place them in a medium pot with and inch or two of water. Bring the pot to a boil then reduce heat and simmer until the beets are tender when pierced with a fork (about 30 minutes). Remove the beets from the cooking liquid and let cool slightly. Once their cool enough to handle, it should be fairly easy to pinch the skins off with your fingers. If you don't want purple hands, where gloves. Discard the skins.

Place the cooked, peeled beets in a food processor. Add the remaining ingredients and puree until smooth, thick and creamy. Serve with toasted pita bread, sliced vegetables, or naan crisps.

Saturday, April 27, 2013

Sesame Sweet Potato Miso Dip

I owe many a luxurious and enlightening Sunday afternoon to one fine group of ladies. How else would I justify needing to spend a cozy hour curled up in an armchair furiously finishing a novel? And more importantly, when would I get to chomp pecan cookies, start drinking at one in the afternoon or have the excuse to make egg-filled cakes and other contraband delights? Give it up for book club.

Sure, sometimes we overdo it on the wine, but typically not until after we discuss the book. Briefly.
Not only do my book club ladies read, they cook. And they eat (with enthusiasm I might add) all the stuff I don't normally get to make at home. And I love them all the more for it.

Every time book club rolls around I'm faced with the impossible decision: sweet or savory? Clearly the answer is both. This time around blueberry-lemon yogurt cake with lemon cream was an easy sell and will be coming in a later post. I have promised Roo an egg-free version. Wish me luck.

The real dark horse though, is this crazy good sweet, silky, salty dip.
Sesame is such a rock star - all that toasty deep earthy flavor of nuts, without the nuts. Add the creamy sweetness of the potatoes, salty bite of miso and my friends, you have one heck of a dip on your hands. 

I actually had no intention of sharing with the kids but when Bean came by asking what that yummy smell was (toasting sesame seeds) I couldn't pass up the opportunity. The kiddos dipped snap peas and carrots and somewhat shockingly, no one snorted, choked, or exhibited odd facial contortions. A couple of kids even came back for a second round. That's a winner in my book.

Sesame Sweet Potato Miso Dip
adapted from Sunset Magazine December 2010

1 pound sweet potatoes
1 tbsp minced fresh ginger
2 tbsp white miso
2 tbsp tahini
2 tsp soy sauce
1 scallion, thinly sliced
toasted sesame seeds for garnish

Peel the sweet potatoes and cut into large chunks. Place the potatoes in a large pot and cover with water. Bring to a simmer over medium heat and cook until soft but not falling apart, about 15-20 minutes. Remove the sweet potatoes from the water and allow to cool slightly. Reserve the cooking liquid.

Combine the cooked potatoes, ginger, miso, tahini, and soy sauce in a food processor or powerful blender. Puree the mixture, adding cooking liquid from the potatoes as needed until the mixture is smooth and silky. Transfer the dip to a serving bowl. Sprinkle with scallions and toasted sesame seeds. Serve with fresh vegetables for dipping.

Wednesday, April 24, 2013

Crispy Iberian Pork Bites

When all else fails, serve dinner on colorful toothpicks.
So easy, very little hands on time, relatively neat to eat one-handed while doing homework, and totally customizable with whatever you happen to have on hand in the spice cabinet, meet your new best friend on a busy school night.
No lemons? Use limes. Not feeling the cumin and paprika? How about lime juice, soy sauce, freshly grated ginger, and a splash of fish sauce for an Asian vibe instead? Use the Spanish-style version below as a jumping off point but then feel free to play around. The flavor profile possibilities are limitless. Try lime, chili powder, cumin, and fresh cilantro for a taco-like feel. Or how about lemon juice, red wine vinegar, thyme, and oregano for a Greek take? Ooh, serve those with some sliced tomatoes and cubes of good Feta cheese. Whatever you do, don't forget the cute toothpicks.

Crispy Iberian Pork Bites
adapted from How to Cook Everything by Mark Bittman

2 pounds pork shoulder, trimmed of some, but not all fat
1 tbsp minced garlic
1 tbsp ground cumin
2 tsp paprika
1 tbsp lemon zest
1 tbsp kosher salt
1/4 cup fresh squeezed lemon juice
1/2 cup minced onion
1 tbsp olive or canola oil

Cut the meat into 1x1-inch cubes. Put the meat in a large, nonreactive bowl and toss with all of the remaining ingredients. Cover and refrigerate for at least an hour and up to 2 days.
Preheat the oven to 375 degrees. Scatter the meat on a rimmed roasting pan in a single layer. Roast for about an hour, stopping to stir the meat occasionally. You want it crisp and brown on all sides, but not burned. Remove the meat from the pan with a slotted spoon. Serve on toothpicks with lemon wedges and/or Cumin Yogurt Dip.

Monday, January 14, 2013

Baked Feta with Tomatoes

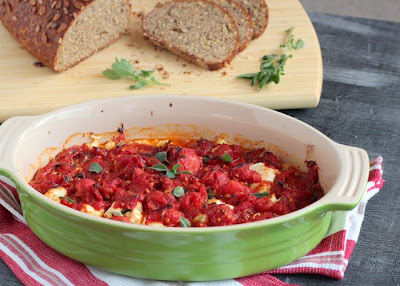
Withholding feta cheese from Looly is considered cruel and unusual punishment. So, when I made this baked feta for a potluck crafting party (Thanks Girl G!) a few weeks ago, I couldn't get it out the door without her finagling a taste. She's a fan. I hope you are too.
The feta is so stellar here because unlike its softer milder cousin, mozzarella, who's constantly trying to monopolize the yummy-when-melted-with-tomato-sauce glory, feta maintains its chewy firmness when baked. And the salt! The briny feta is spectacular alongside gushy, sweet, herby tomatoes.
Speaking of tomatoes I use a combo of fresh and canned. I like the saucy juices of the canned tomatoes alongside the bright bits of pulp and skin from the fresh. Feel free to use all of one or the other, just double up on your quantity.

With the Super Bowl just around the corner, what could be more crowd-pleasing and gut-thawing than a dollop of simple, soothing, savory warm cheese on crusty bread? File under perfect hearty winter party fare.

Baked Feta with Tomatoes

1 tbsp olive oil
3 cloves garlic cloves, minced
1 tsp crushed red pepper flakes
4 fresh, ripe tomatoes, chopped
1 14-ounce can diced tomatoes
2 tbsp chopped fresh oregano leaves
salt and pepper to taste
16 ounces best quality Greek feta cheese you can find

1. Heat the olive oil in a large skillet over medium heat. Add the garlic and saute for 1 minute. Add red pepper flakes and cook 30 seconds more. Add fresh and canned tomatoes and simmer until the sauce is slightly thickened, about 30 minutes. Stir in oregano leaves and season with salt and pepper, but go easy on the salt. The feta will provide lots of salty flavor. Meanwhile, preheat the oven to 400 degrees.
2. In an ovenproof dish, break the feta into pieces large and small. Scatter over the the bottom of the dish. Pour the tomato sauce over the cheese. Bake for about 25 minutes until the sauce is bubbly and thick and the top is just starting to char. Serve with crusty bread.

Tuesday, December 11, 2012

Parmesan & Thyme "Cookies"

In all fairness, Ina Garten calls these Parmesan & Thyme Crackers but I call them cookies. Doing so triples the chances your children will eat them. I recommend it.
Buttery, cheesy, crumbly, herb cookies are so tasty with a sippy cup of milk, a mug of tea, or a glass of champagne, simple enough for kids but elegant enough for your fanciest dinner party.
The thyme is truly magical here. The herbs keep the flavor bright despite the ample butter and cheese. And really, what would a cookie be without a fair amount of butter?

Parmesan and Thyme "Cookies"
adapted slightly from Barefoot Contessa Back to Basics

1/2 cup unsalted butter (1 stick), at room temperature
4 ounces Parmesan cheese, finely grated
1 & 1/2 tsp fresh thyme leaves, minced
1/2 tsp salt
1/4 tsp freshly ground black pepper*
1 & 1/4 cups all-purpose flour

1. Using an electric mixer, cream the butter for about 1 minute. Add the cheese, thyme, salt and pepper and mix until well combined. Add the flour and continue to mix on low until the dough forms large crumbles. If the dough seems too crumbly and won't clump together, add a little water, 1 teaspoon at a time until it is workable.
2. Dump the dough onto a floured counter or board. Press the dough together into a mound and roll into a 9-inch log. Wrap in plastic wrap and refrigerate for at least 30 minutes and up to a few days.
3. Preheat oven to 350 degrees. Line a baking sheet with parchment paper. Use a sharp knife to cut the dough into 3/8-inch rounds and place them onto the parchment-lined baking sheet. Bake for 22 minutes until lightly browned. Cool on wire racks and serve at room temperature.

*The original recipe calls for 1/2 tsp of black pepper but I reduce it by half as the shorties in my house are pepper-averse. Add a little more or less to suit your audience. 
 

Saturday, December 8, 2012

Lamb and Lentil Mini-Meatballs with Cumin Yogurt Dip

Meatballs are usually a hit with the Kid Cultivation crew, but since Roo is allergic to eggs, my go-to substitution is silken tofu. It works beautifully in these Asian-Style Pork Mini-Meatballs, but given Beans love for beans and Looly's hatred of them, I thought I'd try something new.
I was hoping lentils would bind the meatballs and keep them from drying out. Mission accomplished. What I hadn't anticipated was the nice little bite the lentils would give the lamb, such a pleasant snap with each mouthful. They're a little unexpected and boast great flavor with or without the tangy yogurt dip. Cocktail parties, Christmas, New Year's Eve, I'm keeping this one in my back pocket for the holiday party potluck scene.

So, like I said, Looly abhors beans. She possesses a particular vehemence for lentils. She loves a plump sauce-covered meatball, however, especially if it came from Noodles & Company, but I digress. Even at home, she'll eat a meatball with sauce on it most of the time. I was fully prepared to drizzle marinara over these bad boys in anticipation that she would complain about yogurt sauce but I never got a chance. All three kids took down the meatballs before I got any sauce on the table - cumin yogurt or marinara. That never happens!
Now aside from Mufasa's praises, there were no rave reviews, choruses of delight or requests for second helpings from the six and under set. But the important thing is that the meatballs disappeared - no prodding, arguments, threats or negotiations. Of course Looly has no idea she ingested lentils, but I'm already eying a can of chickpeas.

Lamb and Lentil Meatballs

1 cup cooked lentils
1 pound ground lamb
3/4 cup Panko or other bread crumbs
2 tbsp chopped cilantro
2 tbsp chopped fresh mint
1 small onion, grated or finely diced
2 cloves garlic, minced
2 tsp ground cumin
1 tsp kosher salt
1/2 tsp black pepper

1. Preheat the oven to 375 degrees.
2. Put the lentils in a large bowl. Using your hands, mash the lentils a few times until about half of them are mashed into a paste and half are intact.
3. Add the lamb and all other ingredients to the bowl with the lentils. Mix well with your hands until everything is nicely combined.
4. Line a large baking sheet with parchment paper. Roll the meat mixture into small balls, about 1 & 1/2 inches in diameter. Place on baking sheet and cook approximately 15 minutes or until cooked through. Serve with Cumin Yogurt Dip (recipe below)
 Cumin Yogurt Dip

1 cup plain yogurt
1 tbsp chopped cilantro
1 tbsp chopped, fresh mint
2 tsp ground cumin
1 tsp kosher salt

1. Combine all ingredients in a small bowl and mix well. Serve with Lamb and Lentil Meatballs.

Wednesday, November 21, 2012

Carrot, Orange, and Ginger Soup

When multiple 4-year-olds beg to be put to work in the kitchen, there is no better gig than peeling carrots. Don't drift off here, this tidbit might prove particularly useful on Thanksgiving morning, especially if your day goes anything like mine. You'll be dodging a kitchen floor Lego tower, boiling potatoes, simmering cranberries in Zinfandel, separating Brussels Sprouts into individual leaves, rolling out pie crust, and searching for the AWOL box of Panko to a constant warble of "I wanna help."
Hand over a bag of carrots and a peeler and you're free and clear for a half hour, forty minutes if you're lucky. For the record, 4-year-olds are also adept and unhurried at squeezing water out of thawed frozen spinach. File it away.
What to do with those 13 freshly peeled carrots? How about a vat of hearty, bright, gut-warming gingery carrot and orange soup? It works for me.
You just can't beat a good soup this time of year. Here the carrots and orange marry for a humble but optimistic base while the ginger nips at your tongue ever so slightly with each and every sip. It would make a perfect Thanksgiving first course, or save some turkey stock after the big day and whip this up as a healthful recovery lunch.
Carrot, Orange, and Ginger Soup
adapted from The Silver Palate Cookbook

4 tbsp unsalted butter
2 cups yellow onion, chopped
2 pounds carrots, peeled and roughly chopped
3 tbsp fresh ginger, peeled and minced
6 cups turkey stock (or chicken or vegetable stock) - divided
1 cup freshly squeezed orange juice
salt and pepper to taste
orange slices and zest for garnish

1. Melt the butter over low heat in a large, heavy pot with a lid. Add the onions, cover and cook until soft and lightly golden, about 25 minutes.
2. Add the carrots, ginger, and 4 cups of stock. Bring to a boil. Reduce heat, cover, and simmer about 30 minutes until the carrots are very tender. Use an immersion blender to puree soup to desired consistency, adding more of the reserved stock as needed. Alternatively, transfer the hot soup in batches to a blender and puree, adding more stock as needed, until you have your desired consistency.
3. Return soup to pot (if you used the blender method) and stir in the orange juice. Season with salt and pepper. Warm over low heat until heated through. Top each serving with an orange slice and a sprinkle of freshly grated orange zest.

Happy Thanksgiving!

Monday, July 23, 2012

Herby Pea and Ricotta Tart

Mufasa's herb garden is going bananas. I'm hoping to say the same about the tomatoes in a few weeks but for now, the focus is on trying to use as much mint and basil as possible. Hence, this pretty little morsel from the garden. 
I made this tart for my book club a few weeks ago and shockingly the kids were bummed that they didn't get to try it. Had it been a platter of cupcakes I wouldn't have given the matter a second thought, but pea tart? Okay!

Don't ask where Bean's shirt is. Skin, spatulas, and cupcake aprons. That's how we roll.
Herby Pea and Ricotta Tart
adapted from Cooking From the Farmers' Market by Jodi Liano and Tasha DeSerio

8x10-inch rectangle of puff pastry, thawed
2 cups peas, fresh or frozen but thawed
1 cup ricotta cheese
3 tbsp mint, coarsley chopped
3 tbsp basil, coarsley chopped
1 lemon, zest and juice
1 leek, washed and thinly sliced
salt and pepper

1. Bake the puff pastry on a baking sheet lined with parchment paper at 400 degrees for 10-13 minutes until puffy. Remove from oven. Place a second sheet of parchment paper on top of pastry, lay a second baking sheet on top of parchement to compress the puff pastry and return to oven for 10-13 minutes more. Remove when golden brown and crisping at the edges. Set aside to cool.
2. In a food processor, combine half the peas, all the ricotta, half the mint, and half the basil. Process to make a thick puree. Season with salt and pepper.
3. In a separate bowl combine the remaining peas, mint, basil, lemon juice, zest, and leek. Spread the ricotta mixture over the puff pastry. Top with the pea and herb mixture. Garnish with additional mint and basil leaves if desired. Cut into squares and serve immediately.
In the end the girls were not huge fans of the tart as a whole, but they enjoyed the individual elements. Looly liked the peas and puff pastry and ate plenty of both for dinner. Bean liked the peas, the ricotta puree and the puff pastry, but not all together. After much prodding, Roo sampled a tiny taste of puff pastry but as I've mentioned before, he's a one texture at a time kind of kid.

Personally I think it rocks. Lemony, light, crisp, creamy and hearty enough to make a decent lunch. It's good now at the height of summer but I can so see it on an Easter buffet using some new spring peas - yum!