Showing posts with label baked. Show all posts

Monday, January 14, 2013

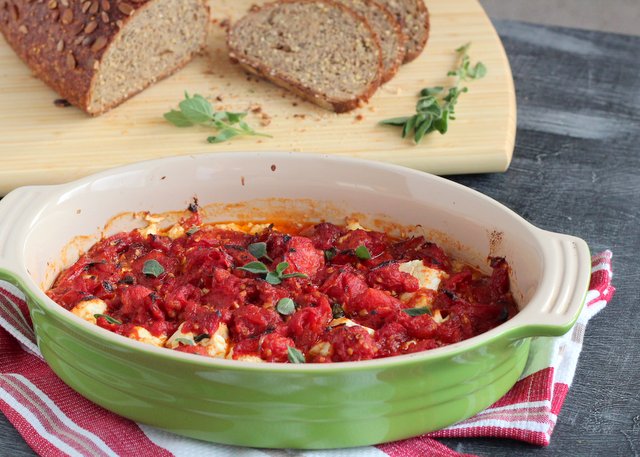
Baked Feta with Tomatoes

Withholding feta cheese from Looly is considered cruel and unusual punishment. So, when I made this baked feta for a potluck crafting party (Thanks Girl G!) a few weeks ago, I couldn't get it out the door without her finagling a taste. She's a fan. I hope you are too.
The feta is so stellar here because unlike its softer milder cousin, mozzarella, who's constantly trying to monopolize the yummy-when-melted-with-tomato-sauce glory, feta maintains its chewy firmness when baked. And the salt! The briny feta is spectacular alongside gushy, sweet, herby tomatoes.
Speaking of tomatoes I use a combo of fresh and canned. I like the saucy juices of the canned tomatoes alongside the bright bits of pulp and skin from the fresh. Feel free to use all of one or the other, just double up on your quantity.

With the Super Bowl just around the corner, what could be more crowd-pleasing and gut-thawing than a dollop of simple, soothing, savory warm cheese on crusty bread? File under perfect hearty winter party fare.

Baked Feta with Tomatoes

1 tbsp olive oil
3 cloves garlic cloves, minced
1 tsp crushed red pepper flakes
4 fresh, ripe tomatoes, chopped
1 14-ounce can diced tomatoes
2 tbsp chopped fresh oregano leaves
salt and pepper to taste
16 ounces best quality Greek feta cheese you can find

1. Heat the olive oil in a large skillet over medium heat. Add the garlic and saute for 1 minute. Add red pepper flakes and cook 30 seconds more. Add fresh and canned tomatoes and simmer until the sauce is slightly thickened, about 30 minutes. Stir in oregano leaves and season with salt and pepper, but go easy on the salt. The feta will provide lots of salty flavor. Meanwhile, preheat the oven to 400 degrees.
2. In an ovenproof dish, break the feta into pieces large and small. Scatter over the the bottom of the dish. Pour the tomato sauce over the cheese. Bake for about 25 minutes until the sauce is bubbly and thick and the top is just starting to char. Serve with crusty bread.

Monday, December 3, 2012

Roasted Seckel Pears with Vanilla Mascarpone Cream and Thyme

Have you encountered the Seckel pear yet this season? I couldn't resist buying a bag last week at the grocery store because they are just so darn cute.
That's a Bartlett standing by for size comparison. 

The kiddos were smitten and they've been slurping their "baby pears" for breakfast, snack, and in their lunchboxes all week. Seckel pears, however, are most definitely not just for kids.
Wouldn't these look snazzy with a cocktail dress and a glass of champagne?! Seriously, what a sexy, succulent two-bite treat for Christmas, New Year's Eve or any event that entails balancing a cocktail and eating with one hand.
Of course you can use a fork.
The soft pears are so lush and velvety and sweet enough to punch any dessert craving in the face, but totally sophisticated and not overly indulgent compared to the hunks of peppermint fudge and frosted sugar cookies that will be here soon enough.
Roasted Seckel Pears with Vanilla Mascarpone Cream and Thyme
adapted from Food52.com

8 Seckel Pears (or 4 larger pears), halved and cored
2 tbsp fresh lemon juice
1 tbsp unsalted butter, diced
1 tbsp granulated sugar
3 tbsp water
5 sprigs fresh thyme

For the cream
1 cup heavey whipping cream
1 whole vanilla bean
1/2 cup Mascarpone cheese
1 tbsp powdered sugar

1. Preheat the oven to 375 degrees. Place cored pear halves cut side up in a baking dish. Drizzle lemon juice over the tops of the pears, dot with butter and sprinkle with granulated sugar. Pour about 3 tablespoons of water into the bottom of the baking dish. Arrange thyme sprigs around the pears. Bake Seckel pears for about 30-40 minutes, flipping the pear halves to skin-side up halfway through baking. Larger pears will take longer to cook - estimate an additional 20 minutes or so. They are done when a fork easily slides through the flesh in the thickest part of the pear. Remove from oven and cool to room temperature.
2. Meanwhile, pour cream into a medium mixing bowl. Slice a vanilla bean in half lengthwise and scrape out the seeds. Add the gooey vanilla seeds to the cream and stir, then throw in the bean pod too. Refrigerate the cream mixture and mixing bowl for an hour or more.
3. Remove the vanilla bean pod from the cream. Add the Mascarpone and beat on medium speed until well combined. Add the powdered sugar and continue beating until soft peaks form.
4. Top each pear with a dollop of the cream mixture. Sprinkle with chopped fresh or roasted thyme leaves (from the pear roasting pan).

Tuesday, November 13, 2012

Easy Baked Cinnamon Apple Chips

My chip fixation continues.

I know what a process it can be to make exciting, tasty, remotely nutritious party food for one kid with food allergies, but with an entire classroom of allergies to contend with, it can be next to impossible. Just try to come up with a safe, healthful "treat" that a bunch of 6-year-olds with candy and costumes on the brain will actually want to eat. I don't want to pull a muscle patting myself on the back but I contend these baked apple chips do the trick.
I made these for Looly's first grade class Halloween party a couple of weeks ago. The kids took them down and came back for more, which considering we were less than 3 hours away from official trick-or-treating time, was freaking amazing.

Better yet these are so easy to make they're really more of a non-recipe. In fact, it didn't even occur to me to post them here until a few adults at Looly's party were stunned that I had made them, automatically assuming that I must have used a food dehydrator or some other obscure gadget. No, friends. Assuming you have an apple, a mandoline, and an oven at your disposal, the process is embarrassingly simple. 
Baked Cinnamon Apple Chips

4 apples, sliced thin on a mandoline, or if your knife skills are that good, have at it that way.*
1 tsp granulated sugar
1 tsp ground cinnamon

1. Preheat the oven to 200 degrees. Line several baking sheets with parchment paper. Place the apple slices in a single layer on the parchment-lined baking sheets. Sprinkle lightly with cinnamon and sugar.
2. Bake for about 2 hours, turning apples over after the first hour. After 2 hours, turn the oven off but leave the apples to continue to crisp up until the oven is cool.

*Leave the skin and core intact. It's just prettier that way. Choose any apple variety you like just keep in mind that the juicier the apple the longer it will take to dry out. For reference, I used Granny Smiths and Honey Crisps.
There you have it - allergy-friendly, kid-approved, healthful, seasonally appropriate baked cinnamon apple chips. They'll keep for several days in an airtight container, but my advice is make them on the day of your shindig. Your house will smell amazing and everyone will assume you're a domestic goddess. Save your leftovers for lunchboxes!