Showing posts with label book club. Show all posts

Thursday, July 11, 2013

Old-School Buttermilk Fried Chicken

In an effort to be both hip and timely my book club read The Great Gatsby last month. It was going to be, well, great. Cool, smart ladies reading classic fiction we hadn't looked at since high school, putting on lipstick, heading out to see Baz Luhrmann's much-hyped film, chatting it over with ice cold gin and tonics afterward. I could almost feel the cigarette holder between my fingers, not that I smoke, but we were just going to be that awesome.

But apparently we forgot. We forgot that we're not 16 anymore with endless summer stretching before us. We forgot the obligations. Work. Travel. Spouses. Pets. Kids. Oh, and some of us need to be in bed by 10 pm. So the movie never got seen. Not by any of us. And then it was gone. Out of the theaters while we were still making our great plans. Awful, right?

At least we still have book club. And this plate of cold fried chicken.
You know the scene? Tom and Daisy huddled at the kitchen table shortly after the accident, a platter of cold fried chicken between them. This is symbolic fried chicken, people.

In keeping with Gatsby, this is old school fried chicken - shake it in a paper bag and deep fry it old school. No Corn Flakes. No oven "frying". No rushing. Old school fried chicken takes time. First there's a leisurely herb-scented buttermilk bath.
Then a slow fry. Resist the urge to make your oil too hot or you'll end up with burnt on the outside, raw on the inside chicken. Nobody wants that. Keep the oil right around 325-350 degrees. Adjust the heat accordingly as you work. Don't speed it. Savor the process. Then eat the chicken. And remember, there's always Netflix
Old-School Buttermilk Fried Chicken
adapted from SimplyRecipes.com

3 pounds chicken pieces (I used 12 drumsticks)
1 quart buttermilk
1 large onion, thickly sliced
1 tbsp Tabasco sauce
1 tbsp cayenne pepper
1 handful fresh parsley, roughly chopped
1 handful fresh thyme
2 cups all-purpose flour
1 tbsp Penzeys Black and Red Spice (or 1/2 tbsp cayenne and 1/2 tbsp ground black pepper)
1 tbsp onion powder
1 tbsp seasoned salt
2-3 cups canola oil for frying

Whisk together the buttermilk, Tabasco sauce and cayenne in a large bowl. Toss in the onion slices, thyme and parsley. Place the chicken pieces into the mixture and marinate at least overnight (8-36 hours). Drain the chicken pieces in a colander.

Heat the oil in a large, deep, heavy pot over medium high heat to 350 degrees. Your oil should be about an inch and a half deep in the pot. 

Meanwhile, layer two large paper grocery bags, one inside the other. This is a great time to bust out the sturdy Whole Foods bags that you have stashed in a closet somewhere. Dump the flour, Black and Red, onion powder, and seasoned salt in the bag. Fold over the top a couple of times to seal the bag and give it a shake. Add the drained chicken pieces, reseal the paper bag and give it a few heart shakes to coat the chicken.

Working in batches, carefully place a few chicken pieces into the hot oil. Don't crowd them. Fry the chicken on one side for about 12-15 minutes then carefully flip each piece and fry the other side about 10 -14 minutes until crispy, golden and cooked through. Drain on paper towels. Season with salt and pepper. Serve hot, or let cool to room temperature, refrigerate and serve it Gatsby-style. Cold.

Wednesday, May 8, 2013

Eggless Lemon Blueberry Cake with Lemon Cream

I baked a version of this lush blueberry lemon cake with eggs for book club a few weeks ago. It must have looked good because soon after, Mufasa put in a last minute request to bring one to "food day" at work. Wondering what all the hype is about, Roo's been clamoring for an egg-free version for weeks. Without further ado....
Roo's Eggless Lemon Blueberry Cake!

That's three times in three weeks! Given the rate at which it's being requested, I'm most grateful that this sweet tart little beaut is not only quick to whip up, but as I've discovered through rampant experimentation, a most forgiving and versatile recipe.
See how the berries formed a layer at the bottom of the cake in the photo above? The key difference I noted between my egg-free version and the original, is that the blueberries tend to sink more in the eggless version, making it imperative that your pan is well-greased, floured, and lined with parchment. Consider yourself warned. Otherwise, bake on with abandon. But don't get too comfortable. Chances are good you're going to be baking this one on instant repeat.

Eggless Blueberry Lemon Cake with Lemon Cream
adapted from TheKitchn.com

For the cake

1 cup all-purpose flour
1/2 tsp baking soda
1/2 tsp baking powder
1/4 tsp salt
2/3 cup granulated sugar
Zest of 1 lemon
4 tbsp (1/2 a stick) of butter
1/2 tsp real vanilla extract
1/4 cup plain Greek yogurt (or vanilla or lemon Greek yogurt)
1/2 cup buttermilk
1 cup blueberries (fresh or frozen)
2 tbsp turbinado sugar

For the lemon cream

1/4 cup heavy whipping cream
1/4 cup lemon flavored Greek yogurt

Preheat the oven to 400 degrees. Grease a round 9" cake pan. Line the bottom with parchment. Grease the parchment. Flour the bottom and sides of the pan.

In a medium bowl, combine the flour, baking soda, baking powder, and salt. Whisk together and set aside.

Put the granulated sugar in a large mixing bowl. Add the lemon zest and use your fingers to massage the zest into the sugar. This is favorite kid job, that is, a job that kids tend to favor,as opposed to a job for your favorite kid. Just make sure your help has clean hands. 
Add the butter and beat with an electric mixer for a few minutes until the mixture is pale yellow, light and fluffy. Don't forget to scrape down the sides and bottom of your bowl. Add the vanilla, yogurt, and buttermilk and beat until everything is well combined.

Add half the flour mixture and beat gently until just incorporated. Scrape down the sides of your bowl, add the remaining flour mixture and beat again until just combined.

Pour the batter into the prepared cake pan. Scatter the berries evenly over the top. Sprinkle the top of the cake with turbinado sugar.

Bake 25-30 minutes until nicely browned on top and set in the center. If the top of the cake starts to get too brown before the center is set, cover the cake with aluminum foil. Remove from the oven and cool 10-15 minutes. Turn the cake out onto a wire rack, carefully remove the parchment paper, and cool completely.

To make the lemon cream, pour the whipping cream into a medium bowl. Whip with an electric mixer until soft peaks form.
Add the yogurt and beat again until you have a luxuriously thick, creamy topping.
 Slice the cake and serve with a dip fat dollop of lemon cream.

Saturday, April 27, 2013

Sesame Sweet Potato Miso Dip

I owe many a luxurious and enlightening Sunday afternoon to one fine group of ladies. How else would I justify needing to spend a cozy hour curled up in an armchair furiously finishing a novel? And more importantly, when would I get to chomp pecan cookies, start drinking at one in the afternoon or have the excuse to make egg-filled cakes and other contraband delights? Give it up for book club.

Sure, sometimes we overdo it on the wine, but typically not until after we discuss the book. Briefly.
Not only do my book club ladies read, they cook. And they eat (with enthusiasm I might add) all the stuff I don't normally get to make at home. And I love them all the more for it.

Every time book club rolls around I'm faced with the impossible decision: sweet or savory? Clearly the answer is both. This time around blueberry-lemon yogurt cake with lemon cream was an easy sell and will be coming in a later post. I have promised Roo an egg-free version. Wish me luck.

The real dark horse though, is this crazy good sweet, silky, salty dip.
Sesame is such a rock star - all that toasty deep earthy flavor of nuts, without the nuts. Add the creamy sweetness of the potatoes, salty bite of miso and my friends, you have one heck of a dip on your hands. 

I actually had no intention of sharing with the kids but when Bean came by asking what that yummy smell was (toasting sesame seeds) I couldn't pass up the opportunity. The kiddos dipped snap peas and carrots and somewhat shockingly, no one snorted, choked, or exhibited odd facial contortions. A couple of kids even came back for a second round. That's a winner in my book.

Sesame Sweet Potato Miso Dip
adapted from Sunset Magazine December 2010

1 pound sweet potatoes
1 tbsp minced fresh ginger
2 tbsp white miso
2 tbsp tahini
2 tsp soy sauce
1 scallion, thinly sliced
toasted sesame seeds for garnish

Peel the sweet potatoes and cut into large chunks. Place the potatoes in a large pot and cover with water. Bring to a simmer over medium heat and cook until soft but not falling apart, about 15-20 minutes. Remove the sweet potatoes from the water and allow to cool slightly. Reserve the cooking liquid.

Combine the cooked potatoes, ginger, miso, tahini, and soy sauce in a food processor or powerful blender. Puree the mixture, adding cooking liquid from the potatoes as needed until the mixture is smooth and silky. Transfer the dip to a serving bowl. Sprinkle with scallions and toasted sesame seeds. Serve with fresh vegetables for dipping.

Monday, January 14, 2013

Baked Feta with Tomatoes

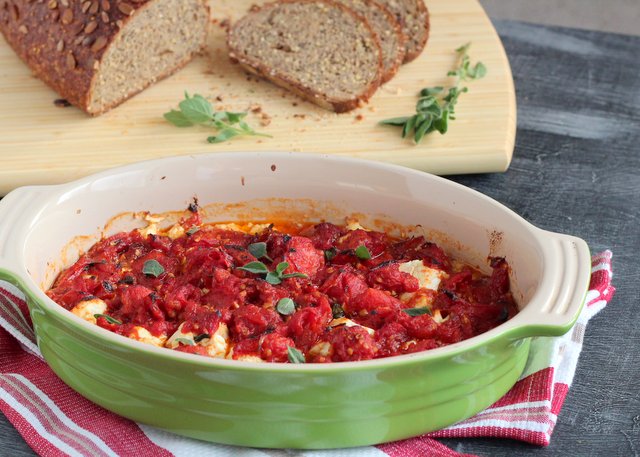
Withholding feta cheese from Looly is considered cruel and unusual punishment. So, when I made this baked feta for a potluck crafting party (Thanks Girl G!) a few weeks ago, I couldn't get it out the door without her finagling a taste. She's a fan. I hope you are too.
The feta is so stellar here because unlike its softer milder cousin, mozzarella, who's constantly trying to monopolize the yummy-when-melted-with-tomato-sauce glory, feta maintains its chewy firmness when baked. And the salt! The briny feta is spectacular alongside gushy, sweet, herby tomatoes.
Speaking of tomatoes I use a combo of fresh and canned. I like the saucy juices of the canned tomatoes alongside the bright bits of pulp and skin from the fresh. Feel free to use all of one or the other, just double up on your quantity.

With the Super Bowl just around the corner, what could be more crowd-pleasing and gut-thawing than a dollop of simple, soothing, savory warm cheese on crusty bread? File under perfect hearty winter party fare.

Baked Feta with Tomatoes

1 tbsp olive oil
3 cloves garlic cloves, minced
1 tsp crushed red pepper flakes
4 fresh, ripe tomatoes, chopped
1 14-ounce can diced tomatoes
2 tbsp chopped fresh oregano leaves
salt and pepper to taste
16 ounces best quality Greek feta cheese you can find

1. Heat the olive oil in a large skillet over medium heat. Add the garlic and saute for 1 minute. Add red pepper flakes and cook 30 seconds more. Add fresh and canned tomatoes and simmer until the sauce is slightly thickened, about 30 minutes. Stir in oregano leaves and season with salt and pepper, but go easy on the salt. The feta will provide lots of salty flavor. Meanwhile, preheat the oven to 400 degrees.
2. In an ovenproof dish, break the feta into pieces large and small. Scatter over the the bottom of the dish. Pour the tomato sauce over the cheese. Bake for about 25 minutes until the sauce is bubbly and thick and the top is just starting to char. Serve with crusty bread.

Monday, July 23, 2012

Herby Pea and Ricotta Tart

Mufasa's herb garden is going bananas. I'm hoping to say the same about the tomatoes in a few weeks but for now, the focus is on trying to use as much mint and basil as possible. Hence, this pretty little morsel from the garden. 
I made this tart for my book club a few weeks ago and shockingly the kids were bummed that they didn't get to try it. Had it been a platter of cupcakes I wouldn't have given the matter a second thought, but pea tart? Okay!

Don't ask where Bean's shirt is. Skin, spatulas, and cupcake aprons. That's how we roll.
Herby Pea and Ricotta Tart
adapted from Cooking From the Farmers' Market by Jodi Liano and Tasha DeSerio

8x10-inch rectangle of puff pastry, thawed
2 cups peas, fresh or frozen but thawed
1 cup ricotta cheese
3 tbsp mint, coarsley chopped
3 tbsp basil, coarsley chopped
1 lemon, zest and juice
1 leek, washed and thinly sliced
salt and pepper

1. Bake the puff pastry on a baking sheet lined with parchment paper at 400 degrees for 10-13 minutes until puffy. Remove from oven. Place a second sheet of parchment paper on top of pastry, lay a second baking sheet on top of parchement to compress the puff pastry and return to oven for 10-13 minutes more. Remove when golden brown and crisping at the edges. Set aside to cool.
2. In a food processor, combine half the peas, all the ricotta, half the mint, and half the basil. Process to make a thick puree. Season with salt and pepper.
3. In a separate bowl combine the remaining peas, mint, basil, lemon juice, zest, and leek. Spread the ricotta mixture over the puff pastry. Top with the pea and herb mixture. Garnish with additional mint and basil leaves if desired. Cut into squares and serve immediately.
In the end the girls were not huge fans of the tart as a whole, but they enjoyed the individual elements. Looly liked the peas and puff pastry and ate plenty of both for dinner. Bean liked the peas, the ricotta puree and the puff pastry, but not all together. After much prodding, Roo sampled a tiny taste of puff pastry but as I've mentioned before, he's a one texture at a time kind of kid.

Personally I think it rocks. Lemony, light, crisp, creamy and hearty enough to make a decent lunch. It's good now at the height of summer but I can so see it on an Easter buffet using some new spring peas - yum!