Showing posts with label baking. Show all posts

Wednesday, May 8, 2013

Eggless Lemon Blueberry Cake with Lemon Cream

I baked a version of this lush blueberry lemon cake with eggs for book club a few weeks ago. It must have looked good because soon after, Mufasa put in a last minute request to bring one to "food day" at work. Wondering what all the hype is about, Roo's been clamoring for an egg-free version for weeks. Without further ado....
Roo's Eggless Lemon Blueberry Cake!

That's three times in three weeks! Given the rate at which it's being requested, I'm most grateful that this sweet tart little beaut is not only quick to whip up, but as I've discovered through rampant experimentation, a most forgiving and versatile recipe.
See how the berries formed a layer at the bottom of the cake in the photo above? The key difference I noted between my egg-free version and the original, is that the blueberries tend to sink more in the eggless version, making it imperative that your pan is well-greased, floured, and lined with parchment. Consider yourself warned. Otherwise, bake on with abandon. But don't get too comfortable. Chances are good you're going to be baking this one on instant repeat.

Eggless Blueberry Lemon Cake with Lemon Cream
adapted from TheKitchn.com

For the cake

1 cup all-purpose flour
1/2 tsp baking soda
1/2 tsp baking powder
1/4 tsp salt
2/3 cup granulated sugar
Zest of 1 lemon
4 tbsp (1/2 a stick) of butter
1/2 tsp real vanilla extract
1/4 cup plain Greek yogurt (or vanilla or lemon Greek yogurt)
1/2 cup buttermilk
1 cup blueberries (fresh or frozen)
2 tbsp turbinado sugar

For the lemon cream

1/4 cup heavy whipping cream
1/4 cup lemon flavored Greek yogurt

Preheat the oven to 400 degrees. Grease a round 9" cake pan. Line the bottom with parchment. Grease the parchment. Flour the bottom and sides of the pan.

In a medium bowl, combine the flour, baking soda, baking powder, and salt. Whisk together and set aside.

Put the granulated sugar in a large mixing bowl. Add the lemon zest and use your fingers to massage the zest into the sugar. This is favorite kid job, that is, a job that kids tend to favor,as opposed to a job for your favorite kid. Just make sure your help has clean hands. 
Add the butter and beat with an electric mixer for a few minutes until the mixture is pale yellow, light and fluffy. Don't forget to scrape down the sides and bottom of your bowl. Add the vanilla, yogurt, and buttermilk and beat until everything is well combined.

Add half the flour mixture and beat gently until just incorporated. Scrape down the sides of your bowl, add the remaining flour mixture and beat again until just combined.

Pour the batter into the prepared cake pan. Scatter the berries evenly over the top. Sprinkle the top of the cake with turbinado sugar.

Bake 25-30 minutes until nicely browned on top and set in the center. If the top of the cake starts to get too brown before the center is set, cover the cake with aluminum foil. Remove from the oven and cool 10-15 minutes. Turn the cake out onto a wire rack, carefully remove the parchment paper, and cool completely.

To make the lemon cream, pour the whipping cream into a medium bowl. Whip with an electric mixer until soft peaks form.
Add the yogurt and beat again until you have a luxuriously thick, creamy topping.
 Slice the cake and serve with a dip fat dollop of lemon cream.

Monday, April 15, 2013

Egg-Free Sunbutter Whirligig Cookies

Whirligig. Say it with me. Whirligig. See, you're having fun already!
I can never seem to bake just a few cookies. A double batch, sure, but who halves a cookie recipe?! Not me.

Inevitably though, after an initial warm out of the oven raid, Mufasa backs way off the cookie consumption. The munchkins, while avid cookie enthusiasts, possess stomachs the size of coin purses and are typically satiated at a one cookie per day rate. That leaves me, gluttonous martyr I am, to do the dirty work. I suffer my way through 3 dozen cookies threatening staleness if I wait too long to put them in my mouth. That, friends, is the hair shirt I wear.

But, oddly, despite strict self-imposed rationing on my end, this batch of whirligigs seems to be disappearing at a steady clip. That can only mean one thing. These suckers are good!
Whirligigs are not the easiest cookies to make. Nor are they the fastest, but don't be put off by the number of steps. Yes, they take a little time and a little nurturing, but stay the course. The reward of soft, chewy, nutty without the nuts, swirly, twirly, whirly cookies is totally worth it.

Egg-Free Sunbutter Whirligig Cookies
adapted from Baked Elements by Matt Lewis and Renato Poliafito

For the cookie dough

2&1/4 cups all-purpose flour
3/4 tsp baking powder
1/2 tsp baking soda
1 tsp salt
6 ounces (1&1/2 sticks) butter
1 cup packed brown sugar
1/2 cup granulated sugar
3 tbsp canola oil
1 cup creamy Sunbutter
3 tsp Ener-G Egg Replacer well mixed with 3 tbsp water
2 tsp real vanilla extract
Parchment paper

For the chocolate filling

12 ounces best-quality dark chocolate
1/2 tsp light corn syrup

To make the Sunbutter dough:

Whisk together the flour, baking powder, baking soda, and salt in a large bowl. Set aside.

Beat the butter, both sugars, oil, and Sunbutter on medium speed for about 5 minutes until light. Add the prepared egg replacer and vanilla and beat again until everything is well incorporated. Don't forget to scrape down the sides and bottom of the bowl in between mixing.

Add half the flour mixture to the wet ingredients and beat again until just combined. Add remaining flour mixture and beat again. Try not to mix more than necessary at this point.

Dump the dough onto a lightly floured work surface and press into a disk shape. Wrap the dough first in parchment paper, then cover the whole thing in a layer of plastic wrap. Refrigerate for at least 3 hours and up to 24 hours.

Now you're ready to roll!
Remove the dough from the refrigerator. Line a large work surface with a sheet of parchment paper. Dust the parchment paper lightly with flour. Break the dough disk in half. Use a rolling pin to roll half the dough out into a rectangle approximately 9 inches x 7 inches and 1/2-inch thick. Don't worry if it's not perfect, but don't roll the dough too thin. If your dough is very soft and pliable at this point, place the rolled out rectangle back in the fridge to firm up a bit. My dough was quite firm already so I skipped this step. Repeat the process with the remaining half of dough.
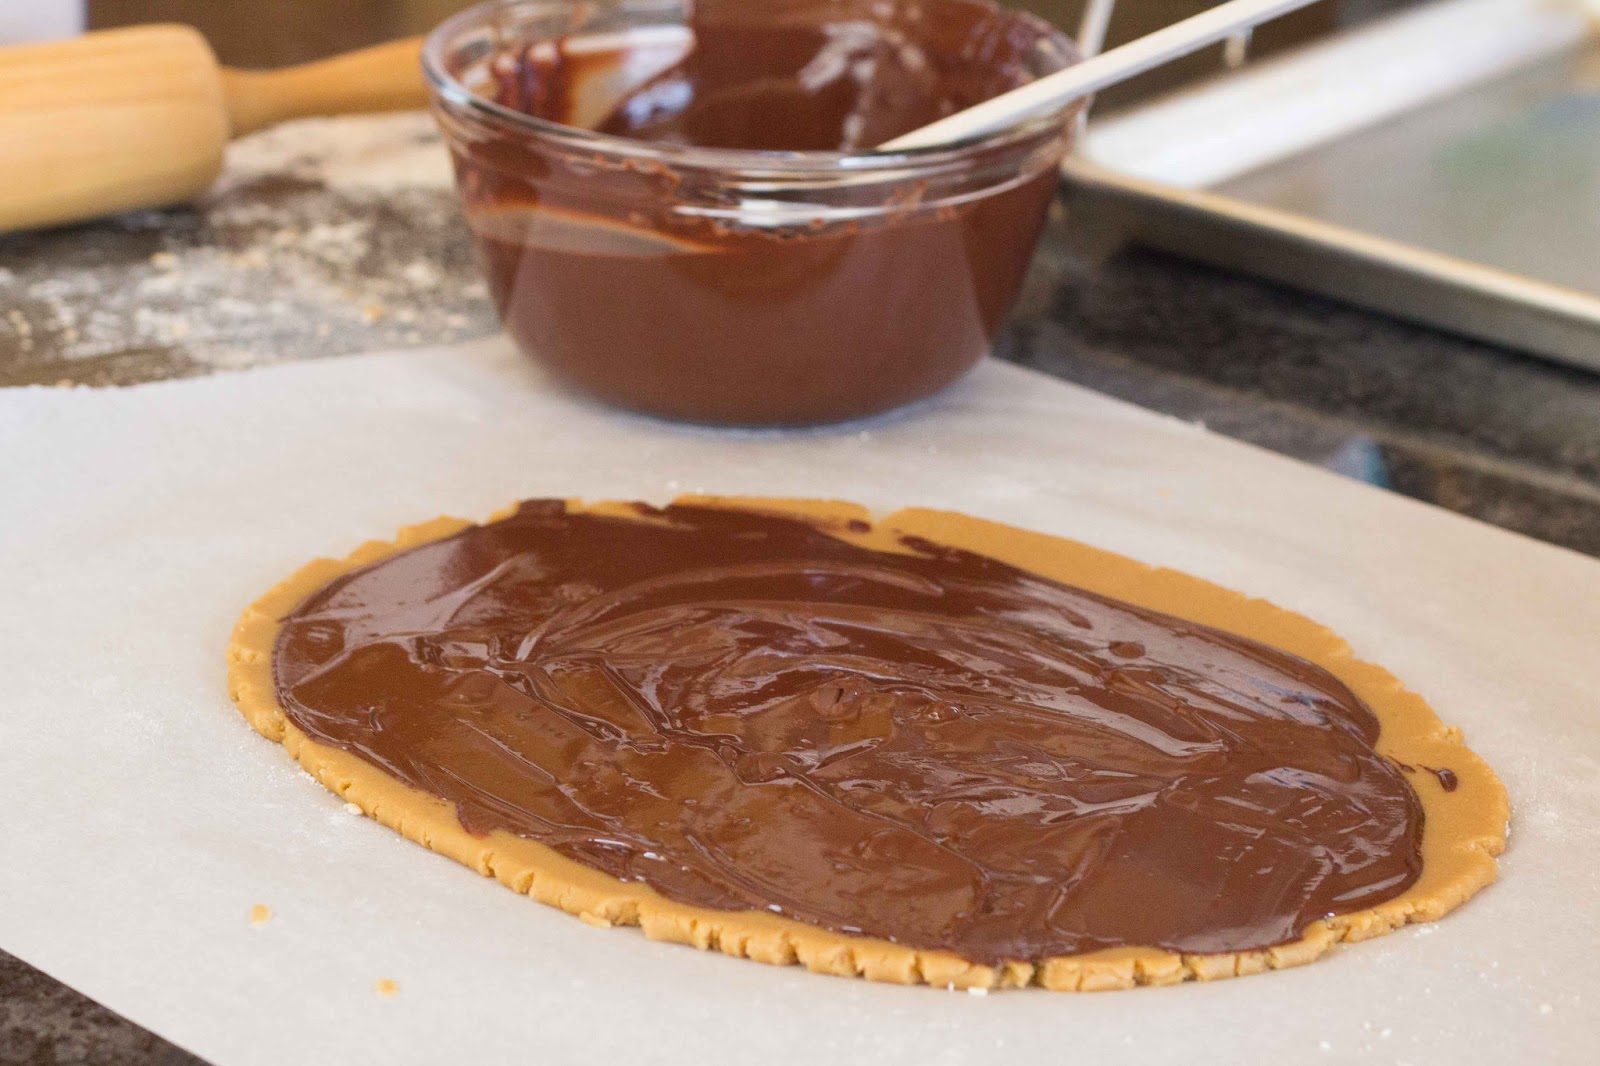
Next, make the chocolate filling. Melt the chocolate and corn syrup together in the microwave in 20 second intervals, stirring in between, until smooth. Paint, pour, or spread the chocolate over the rolled out dough, leaving a 1/2-inch border free of chocolate along one long edge.
Take a deep breath. Starting at the long, chocolate-covered edge, use the parchment paper to help you lift the edge and start rolling the dough into a log. You should be rolling toward the edge with a chocolate-free border. It's probably obvious, but just in case, make sure the parchment remains on the outside of the cookie dough unless you want paper in your cookies.

Take your time and try not to freak out of things don't do exactly as planned. If the dough cracks, gently press the crack back together with your fingers. If the chocolate starts oozing out the ends, great. You know you used enough chocolate. And if your dough snaps apart mid-roll like this...
pour yourself a cocktail and carry on, rolling the broken dough right into the center of the cookie roll. Repeat the process with the other half of the dough. Eventually, you'll end up with something along these lines.
Have I mentioned that I am not a perfectionist? These are whimsical cookies. Expect a little mess. Wrap the dough logs in plastic wrap and refrigerate again, for at least 3 hours and up to a full day.
Preheat the oven to 350 degrees. Line a couple of baking sheets with more parchment paper. Unwrap a chilled cookie log and place on a cutting surface. Using a very sharp or serrated knife dipped in hot water, slice the log into 1/2-inch thick rounds. After much trial and error, I found a small, serrated knife dipped in hot water between each and every cut worked best for me. Repeat with the second log and place the cookies on the prepared baking sheet.
Bake 10-13 minutes, rotating the trays halfway through bake time. They're done when you see the first hint of brown start to form. Remove from oven. Cool on the baking sheets for 5 minutes then transfer the cookies to wire racks to cool completely.

They'll keep for a few days tightly covered...if they last that long!

Tuesday, April 9, 2013

Egg-Free, Nut-Free Oatmeal Chocolate Chip Sunflower Seed Cookies

Almost 15 years ago (how did that happen?!) my sister introduced us to her famous oatmeal, chocolate chip, pecan cookies. We were never the same. Mufasa immediately proclaimed them to be the only cookies on earth worth eating. You might have noticed Mufasa makes a lot of proclamations.

Then came Roo. Sweet, clever, cuddly, hilarious, exuberant, sometimes exasperating Roo, complete with a slew food allergies and well, there went our pecan cookies. We've been trying to come to terms with it ever since.
More than the flawless toasty, nutty, chocolatey, brown sugary essence that is everything a cookie should be, it was the texture of those cookies that really got you. They literally burst with chewy oatmeal to satisfy the molars, gooey chocolate for the tongue, and lots and lots of crunchy, salty nuts.
Nuts are a no no here in the KC house these days, but seeds, we really like seeds. Sunflower seeds in particular are a house favorite. Here they work together with rolled oats and chocolate chips to really amp up the texture of my nut-free, egg-free version of the best cookies on earth. Just ask Mufasa.

These are substantial cookies and this, my friends, is no time for restraint. Do not, under any circumstances, skimp on the chocolate chips, oatmeal, or sunflower seeds.
Oatmeal Chocolate Chip Sunflower Seed Cookies

2 & 1/4 cups all purpose flour (do not sift!)
1 tsp baking soda
1/2 tsp salt
1 cup butter, softened
3/4 cup granulated sugar
3/4 cup brown sugar, packed
2 tsp real vanilla extract
3 tsp Ener-G Egg Replacer whisked and well mixed with 4 tbsp water
1 tbsp softened cream cheese
1 & 1/2 cup rolled oats
2 cups chocolate chips (we like big, dark ones like these)
3/4 cup hulled sunflower seeds

Preheat the oven to 375 degrees. Combine the flour, baking soda, and salt. Whisk to combine.

In a separate large bowl, beat the butter and sugars until creamy. Add the vanilla, egg replacer mixture, and cream cheese and continue to beat until well combined.

Add the flour mixture to the wet ingredients, 1/3 at a time, mixing well between additions. Add the oatmeal and mix again. Stir in the chocolate chips and sunflower seeds. Drop by tablespoon onto parchement-lined cookie sheets (or line them with Silpat mats) and bake 9-11 minutes until lovely, fragrant, and golden brown.

Makes about 4 dozen cookies.
Don't forget the milk!

Sunday, March 24, 2013

Homemade Artisan Bread

Some women fantasize about Italian leather and diamond jewelry. Not me. I fantasize about bread. Lopsided crackling loaves of mouth-scathingly crusty on the outside, chewy, almost gummy on the inside bread really get me.
Looly is as fanatical about her bread as me. Bean is hardly one to refuse a warm slice with butter and lately, Roo's been coming around to embrace the crumb too. This is huge for those of you who aren't familiar with his oral textural struggles, and I'm all for keeping the trend moving forward.

But good bread, really, truly good bread, is hard to come by. Say nothing of that nonsense they pawn off as "Italian bread" or "baguette" at the grocery store. Lucky for us we have 2 honest to goodness bread bakeries within walking distance of home. But, they can never make the nut-free promises we need to keep Roo safe. Hence my excitement over the book, Artisan Bread in Five Minutes a Day by carbohydrate dream team Jeff Hertzberg and Zoe Francois.

I admit, I was a skeptic. It's not that I didn't believe I couldn't whip something up in 5 minutes as promised by the book's title. It's that I didn't believe I'd really want to eat the resulting loaf. I thought it would be disappointing, not crusty enough, dry in the middle. How very wrong I was.
The master recipe upon which all others in the book are based, known simply as "boule" in our house, has become a near daily honored guest at our dinner table. The 5-minute method does not take rising and resting time into account. It also requires a few items you probably don't have on hand yet but that can be acquired easily thanks to my friend, amazon.com. Once you have everything you need, the process is really simple and I promise you will not be disappointed.

Here's the equipment you'll need:

Storage bucket or other food safe container with a loose fitting lid (5-quart or larger)
baking stone or pizza stone (I use this one)
pizza peel (I use this one and it works well for bread and pizza)
Dough whisk (totally optional, but handy)
granulated yeast - pretty much any dry yeast will do, instant or otherwise. I'm currently using Fleischmann's Instant Dry Yeast

Now you're ready to get to work.

Homemade Boule (free-form Artisan Bread)
from Artisan Bread in Five Minutes a Day

Recipe makes four 1-pound loaves

3 cups lukewarm water (not hot!)
1 & 1/2 tbsp granulated yeast (2 packets)
1 & 1/2 tbsp kosher salt
6 & 1/2 cups unbleached, all-purpose flour (do not sift)
cornmeal to sprinkle on the pizza peel to allow easy dough transfer

1. Pour the lukewarm water into a 5-quart or larger bucket. Add the yeast and salt to the water. Stir to combine but don't worry about dissolving every last granule.

2. Add all of the flour. Mix with a dough whisk, wooden spoon, or your hands until the flour is incorporated. If you're using your hands, get them wet first to prevent the dough from sticking to your everywhere. There is no need to knead the dough.

Set the bucket aside, cover loosely (no tight lids!), and let it rise until it flattens on top and/or begins to collapse, about 2-3 hours depending on your room temperature and the temperature of the water you started with.
At this point you can put the bucket of dough in the fridge for later baking. It will keep in the refrigerator for a solid week at least, and you can cut a hunk off to bake at any time. If you're hungry for bread like me, get ready to bake!

Sprinkle a pizza peel with cornmeal. Don't be stingy. More cornmeal helps the dough slide easily off the peel and onto the baking stone.

Sprinkle the top of your dough with a little flour. Don't worry, it won't affect the bread itself but will help prevent sticking as you're trying to cut off a hunk. Grab some dough in your hand and pull it up and out of the bucket. Using a serrated knife, cut off a chunk about the size of a grapefruit. This will be approximately a 1-pound loaf.

Take the hunk of dough in your hands and gently wrap and stretch the surface of the dough around itself and tuck the ends under, turning the dough as you go to make a shape somewhere between a ball and a disc with a smooth outer "skin". It should look something like this.
Place the dough on the prepared pizza peel and let it rest for about 40 minutes.

Place your baking stone in the oven and preheat for at least 20 minutes to 450 degrees. Put an empty broiler tray (or other old pan you don't care about) on any oven rack that won't get in the way of the bread rising as it bakes. You will be pouring water into the pan to create steam while the bread bakes.

After the dough has rested for 40 minutes, dust the surface with flour and use a serrated knife to slash a shallow pattern (about 1/4-inch deep) into the top. A tic-tac-toe pattern or scallop work well but you can get creative. It doesn't need to be perfect.
Using a quick thrusting motion, slide the dough off the pizza peel and onto the preheated baking stone. Using the hottest tap water you can muster, quickly and carefully pour 1 cup of hot water into the broiler pan and close the oven as soon as possible. This will create steam.

Bake for about 30 minutes, until the crust is deep brown. I find my oven consistently takes closer to 45 minutes to get a good crust, but fear not. The dough is wet enough that it's very difficult to dry out the center of the loaf even with longer baking time. Use the pizza peel to remove the bread from the oven and cool on a wire rack.

Store the remaining unbaked dough in the refrigerator for a week to ten days and cut off a hunk any time the mood strikes.

Wednesday, March 13, 2013

French Chocolate Cake

March is a big birthday month here at Kid Cultivation and Mufasa is first in line.
Typically I'm all about inclusiveness, food allergies and all, but not when it comes to the point of exclusiveness. You follow, right? I didn't think so.

Backstory: 10 years ago I picked The Cook's Encyclopedia of Chocolate out of the bargain bin at Border's (yup, Border's, remember that relic of the past?) About 3 recipes into the book, there's this deep, dense, elegant, nearly flourless slim chocolate cake that caught my attention. That year, long before the KC kids were in existence, I made it for Mufasa's birthday, at which time he declared it his birthday cake every year from here on out unless otherwise specified. For the record he has never otherwise specified.

Then we entered this strange land of food allergies and eggs, in my baking at least, fell by the wayside. It's not fair to tell a 4-year-old he can't have any cake when everyone else is oohing and ahhing over the fudgy goodness. But, it's not fair to deprive a pre-diabetic adult man his most treasured and anticipated annual indulgence either. So, sorry Roo. This one's for Daddy.
By the way, Roo enjoyed a generously frosted dark chocolate vegan cupcake, much to the dismay of his sisters who were forced to eat the "regular" French Chocolate Cake.
French Chocolate Cake
From The Cook's Encyclopedia of Chocolate

9 ounces bittersweet chocolate, chopped
1 cup unsalted butter, cut into small pieces
1/2 cup sugar
2 tbsp brandy or triple sec
5 eggs
1 tbsp all-purpose flour
powdered sugar (for dusting)

Preheat the oven to 350 degrees. Grease a 9-inch springform pan with butter or cooking spray. Trace the bottom of the springform pan onto a sheet of parchment paper and cut out a circle to fit the base of the pan. Lay the parchment circle in the base of the springform pan, and grease the top of the parchment paper too for good measure. Wrap the bottom and sides of the pan in foil to prevent water from seeping in during cooking. It should look like this:
In a double boiler (or the microwave), melt the chocolate, butter, and sugar, stirring frequently until smooth. Cool slightly and stir in the liquor.

Put a tea kettle on the stove to boil. I'm serious. 

In a separate large bowl beat the eggs lightly for about a minute. Add the flour and beat again. Slowly stir in the melted chocolate mixture and stir until well blended. Pour the batter into the prepared pan.

Place the springform pan into a large roasting pan or other rimmed pan. Open the hot oven and place the whole ensemble on the center rack. Carefully pour boiling water from the tea kettle into the roasting pan until it comes up about 3/4-inch up the sides of the springform pan. Bake 25-35 minutes, until the edges of the cake are set but the center is still a bit soft.
Remove the springform pan from the oven. Be careful not to drip hot water everywhere. Remove the foil and cool the cake on a wire rack. Don't worry if the cake starts to sink in the center. It's supposed to be slim. Remove the side of the springform pan. Let the cake cool completely. Flip the cooled cake over onto your serving platter, so it's bottom side up. Remove the base of the springform pan and the parchment paper.
Cut 6-8 strips of parchment paper and lay them over the cake in a crisscross pattern.
Sprinkle powdered sugar over the top of the cake then remove the strips.
Happy birthday, Mufasa! I hope it was worth the wait.

Saturday, March 2, 2013

Strawberry Ricotta Scones

One sweltering and blindingly sunny summer day an eternity ago, we went strawberry picking. After shortcakes, smoothies, balsamic strawberry jam with cracked pepper, and much strawberry limeade, we ended up with about 5 pounds of berries in the freezer, where they've been hanging out gathering ice crystals ever since. Obviously, it's time to use them before the next strawberry season rolls around, but any old smoothie won't do for these conserved nibble-size beauts. Hard-earned berries require something special.
A few months ago I made these egg-free Blackberry Meyer Lemon Ricotta Scones and I haven't been able to shake their legacy since. Is there a better place to nestle sweet tender summer berries in the dead of winter than in between flaky warm layers of whole wheat ricotta scones? I for one think not.
Strawberry Ricotta Scones
adapted from The Smitten Kitchen Cookbook

1 cup whole wheat flour
1 cup all-purpose flour
1 tbsp baking powder
1/3 cup sugar*
1/2 tsp kosher salt
6 tbsp cold, unsalted butter
1 cup strawberries (fresh or frozen), coarsely chopped
3/4 cup ricotta cheese
1/3 cup buttermilk

*I upped the sugar just a tad from the original recipe because well, I like sugar, but what I really mean to say is that it offsets the tartness of these particular strawberries. Let your berries be your guide and if yours are particularly sweet, feel free to reduce down to 1/4 cup of sugar.

Preheat the oven to 425 degrees and line a baking sheet with a Silpat mat or parchment paper.

In a large bowl, whisk together both flours, baking powder, sugar, and salt. Using a pastry blender or 2 forks, cut the cold butter into the flour mixture until the largest bits are about the size of a small pea. Be patient. It will happen.
Chop the berries coarsely (some big hunks are good!) and add to the flour mixture. Stir to combine.
Add the ricotta and buttermilk all at once. Stir with a rubber spatula until just combined. Knead the dough a few times with your hands then dump it out onto a well-floured surface. Pat the dough into a round about 2 inches high. You can add a little more flour to the top of the dough to prevent it from sticking to your hands if it's super sticky.
Use a sharp knife and a steady hand to slice the round into 8 even wedges. Carefully transfer each wedge to the prepared baking sheet.
Bake 15-18 minutes until the scones are golden brown and dry and crisp at the edges. Remove the pan from the oven and allow to cool for a few minutes before transferring the scones to a wire rack to cool completely.
If you really want to do it up, serve them alongside balsamic strawberry jam with cracked pepper or vanilla mascarpone cream. May the sweet flavor sustain you until the return of berry season!

Wednesday, February 20, 2013

Bacon Chocolate Chip Biscuits

Roo has a thing for Mo's Dark Chocolate Bacon Bar from Vosges. In fact he relishes his "chocolate bacon" so much that he received the Mini Bacon Chocolate Library for Christmas. By now we're all well-versed in the trend. Bacon and chocolate, chocolate and bacon. Old news, right?

But how about the crispest brown sugar-crusted bacon to ever grace your lips entwined with gooey, bittersweet chocolate wrapped in the warm buttery hug of a fluffy, buttermilk biscuit?
That's what I thought.

This all started because Deb over at Smitten Kitchen has this recipe in her killer new cookbook (which, in my house is already dog-eared and exploding with butter stains and a rainbow of post-it-notes) for Maple Bacon Biscuits. I like bacon. Bacon is my friend. There's a jar of bacon grease living on my kitchen window sill. It's kind of like a sun catcher but way more utilitarian. But maple syrup? Eh.
Born and raised in the Great Northeast it's a sacrilege to shun maple syrup, but I can't help it. It just doesn't do it for me, unless it's in a cocktail shaker with a few fingers of bourbon and lots of freshly squeezed lemon juice but that's a story for another day.
 Chocolate, though. Chocolate I can get behind in all its guises.
We're going to be candying some bacon in a minute here. It's crucial to point out that once you have completed this process you will never be the same. From this day forward you will in all likelihood require brown sugar-crusted bacon on peanut butter (or in our case, SunButter) toast. You will sprinkle it on frosted cupcakes. You will use it to garnish pasta, spinach salads, and in homemade granola. You might even find yourself tossing the last few crumbles into a French press along with the coffee grounds just to see. I thought I had better let you know.
Bacon Chocolate Chip Biscuits
Inspired by The Smitten Kitchen Cookbook
makes 12 2-inch biscuits

6 slices thick-cut bacon (about 6 ounces)
3/4 cup brown sugar, packed
3 cups all-purpose flour
4 tsp baking powder
1 tsp baking soda
1 tsp salt
8 tbsp (1 stick) cold butter, diced
4 tbsp cold bacon fat (or 4 additional tbsp cold butter, diced)
1 cup bittersweet chocolate chips
1 scant cup buttermilk

Preheat the oven to 350 degrees. Line a baking sheet with foil (trust me here). Place a metal cross wire cooling rack on top of the foil lined baking sheet. Spread the brown sugar in a shallow dish and dredge the bacon slices from tip to tail on both sides, pressing the sugar to make it stick. Lay the coated bacon on the wire rack. Bake for 20-30 minutes until the bacon is very crisp and dark at the edges. Let the bacon cool slightly, use a spatula to release the strips from the wire rack, then cool completely. Chop into small pieces.

Turn the oven up to 425 degrees. Line a baking sheet with parchment paper or a Silpat mat. Whisk together the flour, baking powder, baking soda, and salt in a large bowl. Use a pastry cutter or two forks to cut in the cold butter and bacon fat until the largest clumps are the size of small peas. (If you don't happen to keep a jar of bacon fat on your window sill like me, all is not lost. You can safely substitute more butter for the bacon fat, though I suggest you consider reserving your bacon grease going forward. Try it on roasted Brussels sprouts instead of oil and top with what else? Candied bacon!)

Stir in the chopped bacon bits and chocolate chips. Add the buttermilk all at once and stir gently until just combined. Dump the dough onto a well floured surface and knead it a couple of times until it holds together. The less you handle it the better. Gently press the dough to a 1-inch thickness. Use a 2-inch biscuit cutter or inverted drinking glass to cut out 12 biscuits. Place the biscuits on the parchment lined baking sheet and bake for 12-15 minutes until the tops are light golden brown.